To find Information on what safety and security concerns for using Zoom click HERE
What do I need to do if setup a Zoom account before the District integrated Zoom with Clever?
- Go to the student links page (https://links.min201.org) and click on Clever.
- Login to Clever using Google if prompted and enter in your MIN201.org email address and password.
- On the dashboard click on Zoom icon
- You will be prompted to confirm your email address. You will receive an email to confirm that your account will be managed by the District.
- Once accepting the District managed email, you’ll want to log in to Clever to access Zoom and set up any future meetings.
Teacher Setup
Step 1: Log into Clever using the link on the student's homepage (https://links.min201.org). Enter in your MIN201.org email address and password.
Once logged into Clever, scroll down to where the apps are. Click on Zoom.
Step 2: Click the schedule a meeting button at the top.
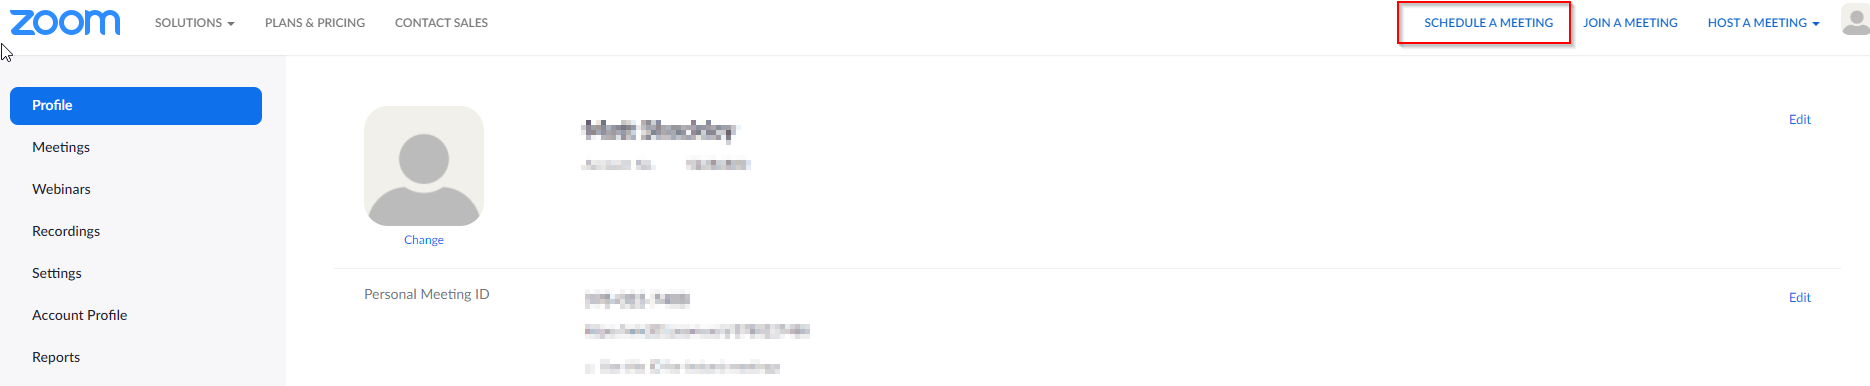
This will bring you to the schedule menu.
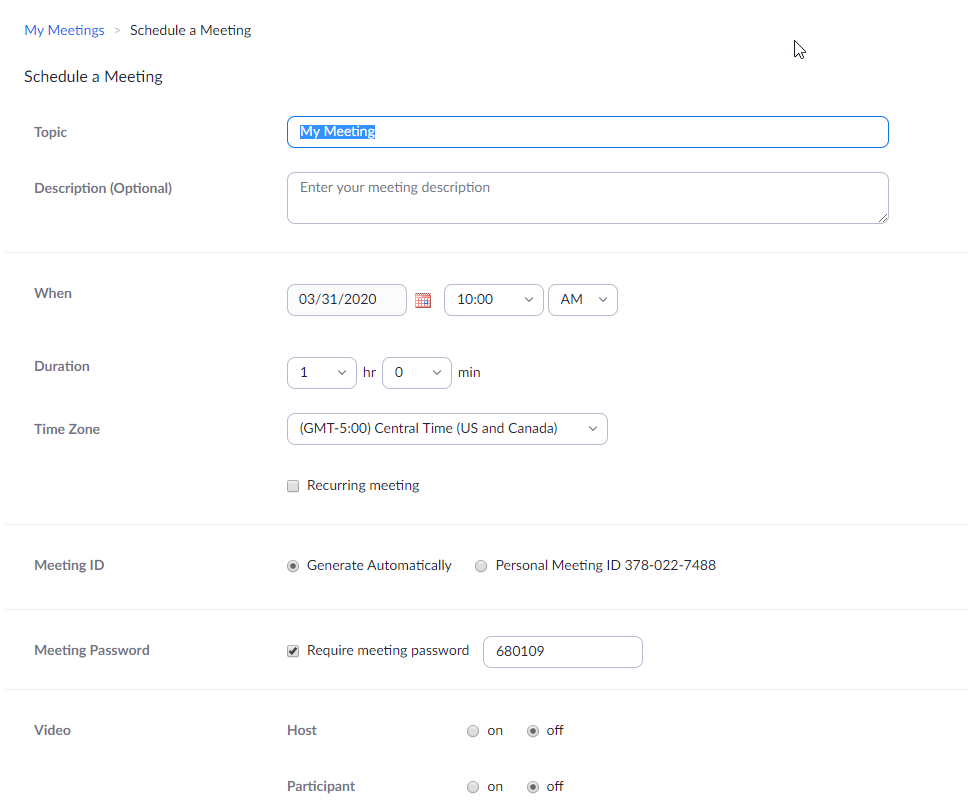
Step 3: Here you can adjust the meeting details and settings to fit your needs. Set them whatever way works best for you. Once you hit save, you will see a join URL. (This will be different for each meeting you set up).
NOTE: Adding a password to your meeting will make it more secure, student will need this password to be able to enter your meeting.
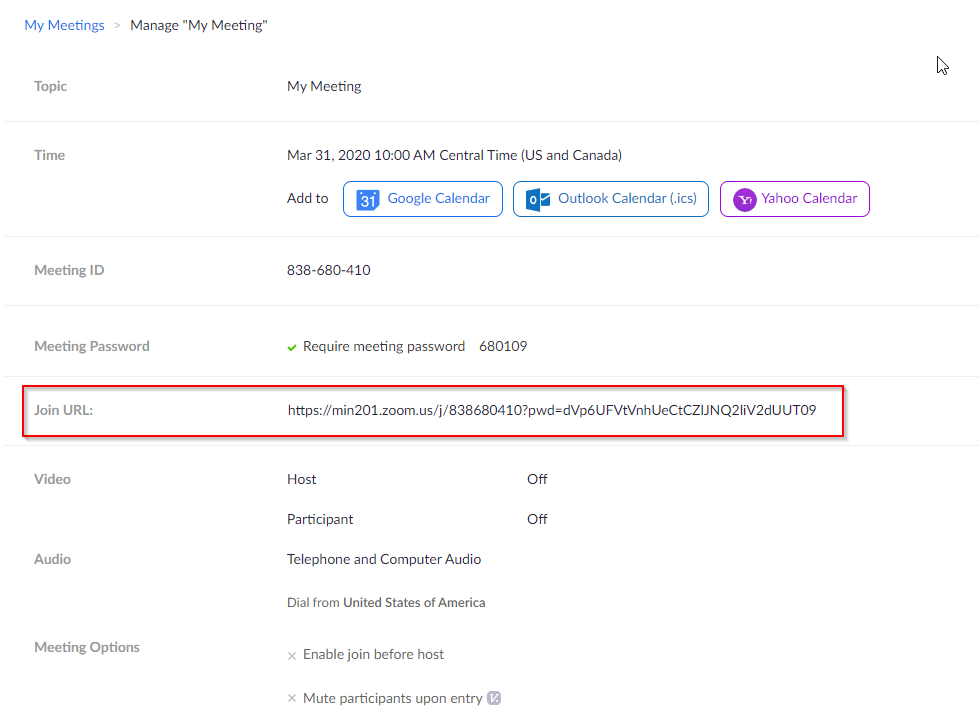
Step 4: Send the join URL to whoever is joining the meeting. (Send this link via Google Classroom, Class Pages, or however you are communicating to your parents and students)
Step 5: When you are ready to start your meeting, go to the meeting tab, find the meeting you scheduled, and hit start.
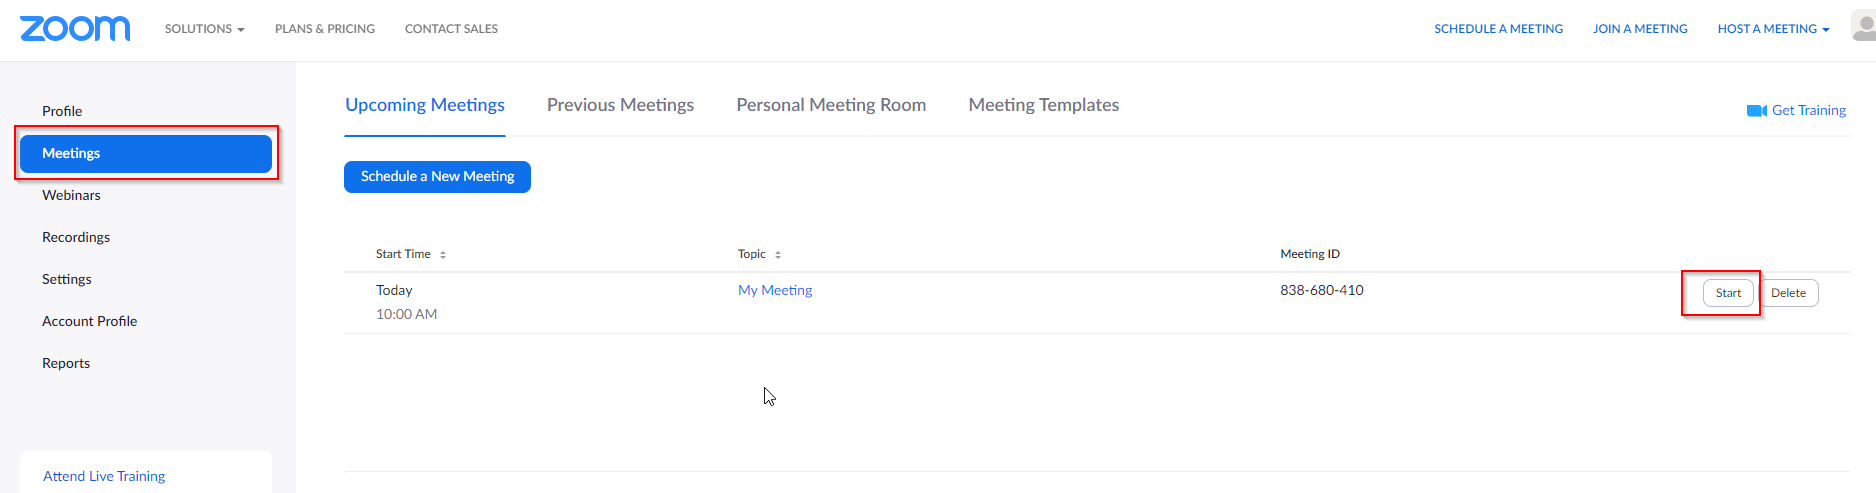
*Note: If you set your meeting to "recurring", it will happen at whatever time you set. It will also use the same URL each time.
Student Sign-In
Students do NOT need to sign into Zoom to use it. After the receive your meeting invitation URL (via Class Pages, parent email, Google Classroom, etc) all they need to do is click on the link. Zoom will open in their browser. They do not need to download any software to use the program. They will be prompted to enter their first and last name - and then they will enter the meeting.
Logging in with Clever is for staff only. Students do not need to login to Clever, or Zoom, to use the program.
------------------------------------------------------------------------------------------------------------------------------------------------------------------------------------------------------------------------------------------
Zoom General Functions
Locking a Meeting
Locking a meeting will not allow any more new attendees once all your students have joined you can lock the meeting to prevent un-authorized people from joining
- Click on Manage Participants
- Click More
- Click on Lock Meeting
Recording a Class for Distribution
This feature is to be used to record yourself (without students) teaching a lesson, and then sending out to students.
- Start a Zoom meeting.
- Press the Record button

- Teach your Lesson
- End Meeting (INSERT PHOTO)
- It will ask where you would like to save your recording, save it somewhere you will remember.
Important Zoom Controls
- Managing Participants : As the host of the meeting/class you can manage participants. This includes renaming, muting, and stopping their video. These will be useful if hosting a live class/meeting.

- Video ON/OFF: Once in a meeting, you can turn your video on by clicking the ‘Start Video’ icon on the bottom left of your screen. To turn it off click the ‘Stop Video’ icon.
- Muting: To ensure minimal background noise, it is HIGHLY recommended that you mute everyone on the call when they are not talking. This feature is turned on by default.

- Chat in a Meeting: Meeting participants can ask questions during the meeting via the chat. Start by clicking on the Chat icon on the bottom right of your screen.
- Sharing Screen: Click the Share Screen icon at the bottom of your screen to share your desktop.

- If you’d like to share specific windows or applications, you can choose to do so from the dialog box.

- If you’d like to share specific windows or applications, you can choose to do so from the dialog box.
Ending a Meeting
- When ending, press End Meeting

- Be sure to press "End Meeting for All", otherwise student will remain in the meeting with themselves.

Tips for Virtual Lessons
- For your first class, set aside some time to introduce your students to Zoom, and ensure they’re able to connect their video and audio.
- Give an agenda or plan for each class by Screen Sharing a slide or document at the beginning of class.
- Discuss online etiquette and expectations of the students in your first virtual class and periodically revisit these topics.
- Allow for time to answer questions that your class has submitted. Consider letting them ask the questions ‘live’ by unmuting them after they have indicated they have a question via the chat feature.
Tips for Content Delivery
- Look at the camera and make eye-contact with your students. This helps create a more personal connection while teaching class over video.
- Take a second to check the chat, to check in with your students and get feedback.
- Speak as if you’re face-to-face with the class, while ensuring you’re at the appropriate distance from the microphone. It is always okay to ask for feedback from students if they can hear you, or if you are too loud/too quiet.
- When delivering a presentation, sharing images, files, or video - give your students a moment to open or take in what you’ve shared.
- Embrace the pause. Take a moment after the end of your comments, and allow for students to engage before continuing on.
Student Troubleshooting
- If a student’s audio/video is choppy, their internet may be under heavy use (bandwidth issue). Have the student turn off any other items using a lot of bandwidth (Netflix, Youtube videos, video game downloads).
- If the entire class is receiving choppy audio/video, the bandwidth issue may be on your end.
- Some student’s internet connections simply may not be able to handle Zoom. In this case, it may be better for them to watch a video later, rather than watch the live session.
To be used later for additional documentation/photos:
https://support.zoom.us/hc/en-us/articles/203650445-In-Meeting-Chat
https://support.zoom.us/hc/en-us/articles/210707503-Virtual-Background
https://support.zoom.us/hc/en-us/articles/206476093-Getting-Started-with-Breakout-Rooms
https://support.zoom.us/hc/en-us/articles/205677665-Sharing-a-whiteboard
How do my students log in to Zoom?
They will click on the meeting URL that you sent them in Google Classroom, eLearning page, etc.
Enter their name and then click join.